A Guide for First Timers on How to Install a WordPress Theme
HomeBlogBloggingA Guide for First Timers on How to Install a WordPress Theme
WordPress is a popular Content Management System powering over 43% of websites across the globe. Creating a website with WordPress is a simple process, as well as, designing it. WordPress comes with easy-to-install themes and plugins for added functionality without the hassle of coding. One of the simplest ways of customizing your website is by installing a theme.
In this WordPress theme guide, we’ll explain what a WordPress theme is and how can beginners easily install a WordPress theme.
What is a WordPress Theme?
A WordPress theme is a pre-made design template coded specifically for a WordPress website. Themes are coded by developers, each with varied colours, fonts, header and footer layouts, page formatting, and a lot more.
Depending on the type of website you are running you can choose and install a theme of your choice. There are thousands of readymade premium and free WordPress themes available for beginners that can be easily installed as per their needs and likings. If you’ve purchased WordPress Hosting to host your WordPress website, you will easily find these readymade themes in your WordPress repository.
Let us now move on to understanding how to install a WordPress theme on your website with ease.
Steps to Install a WordPress Theme
Method I: Searching for a theme
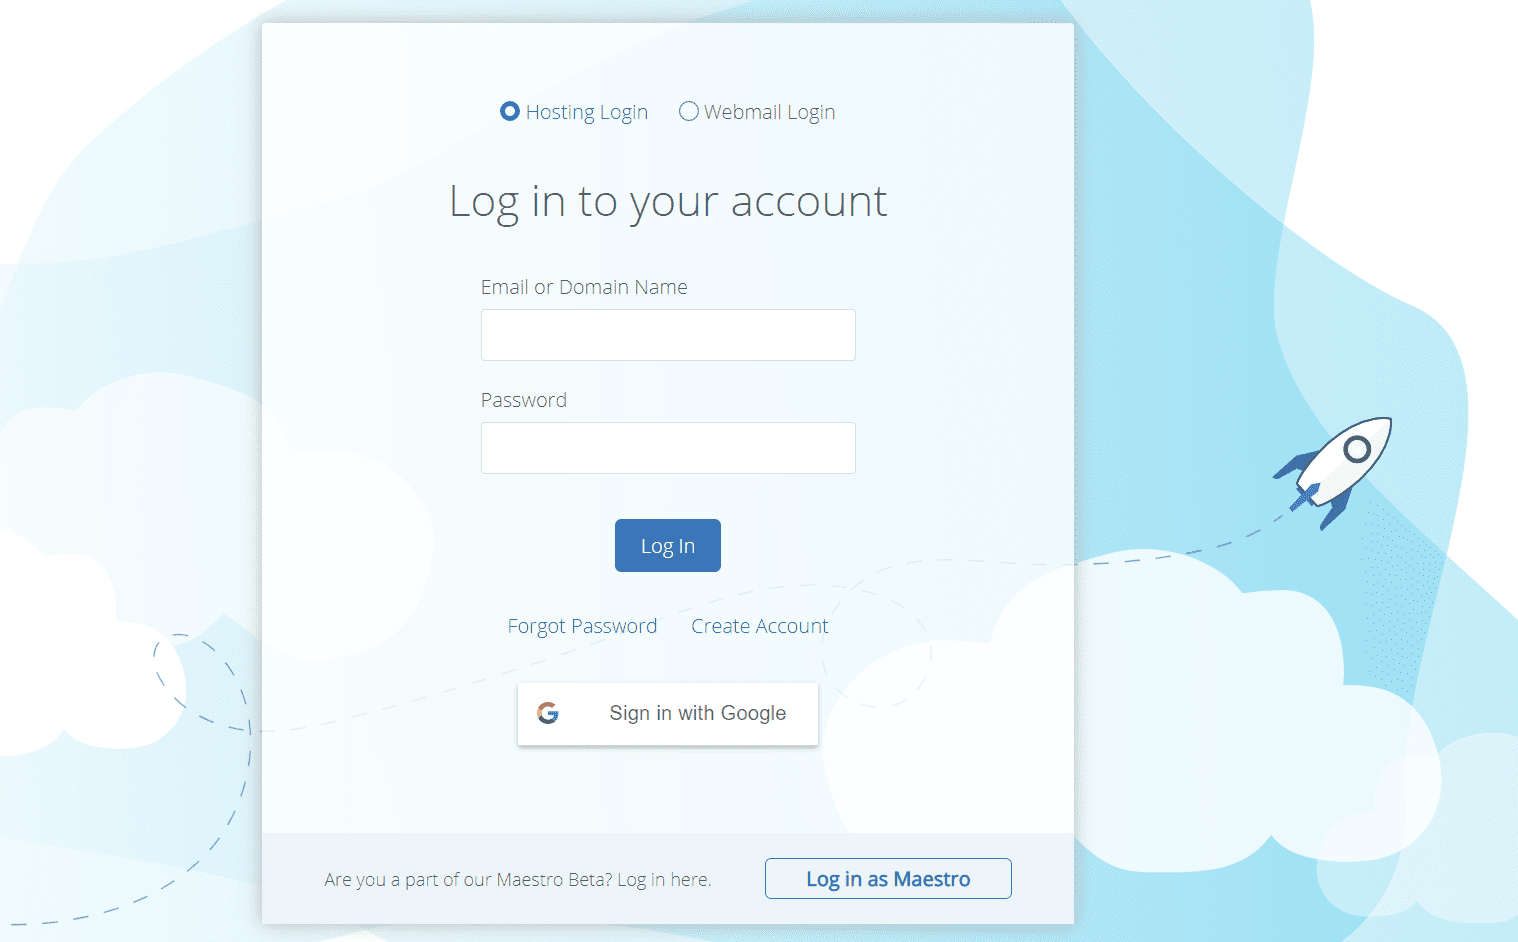
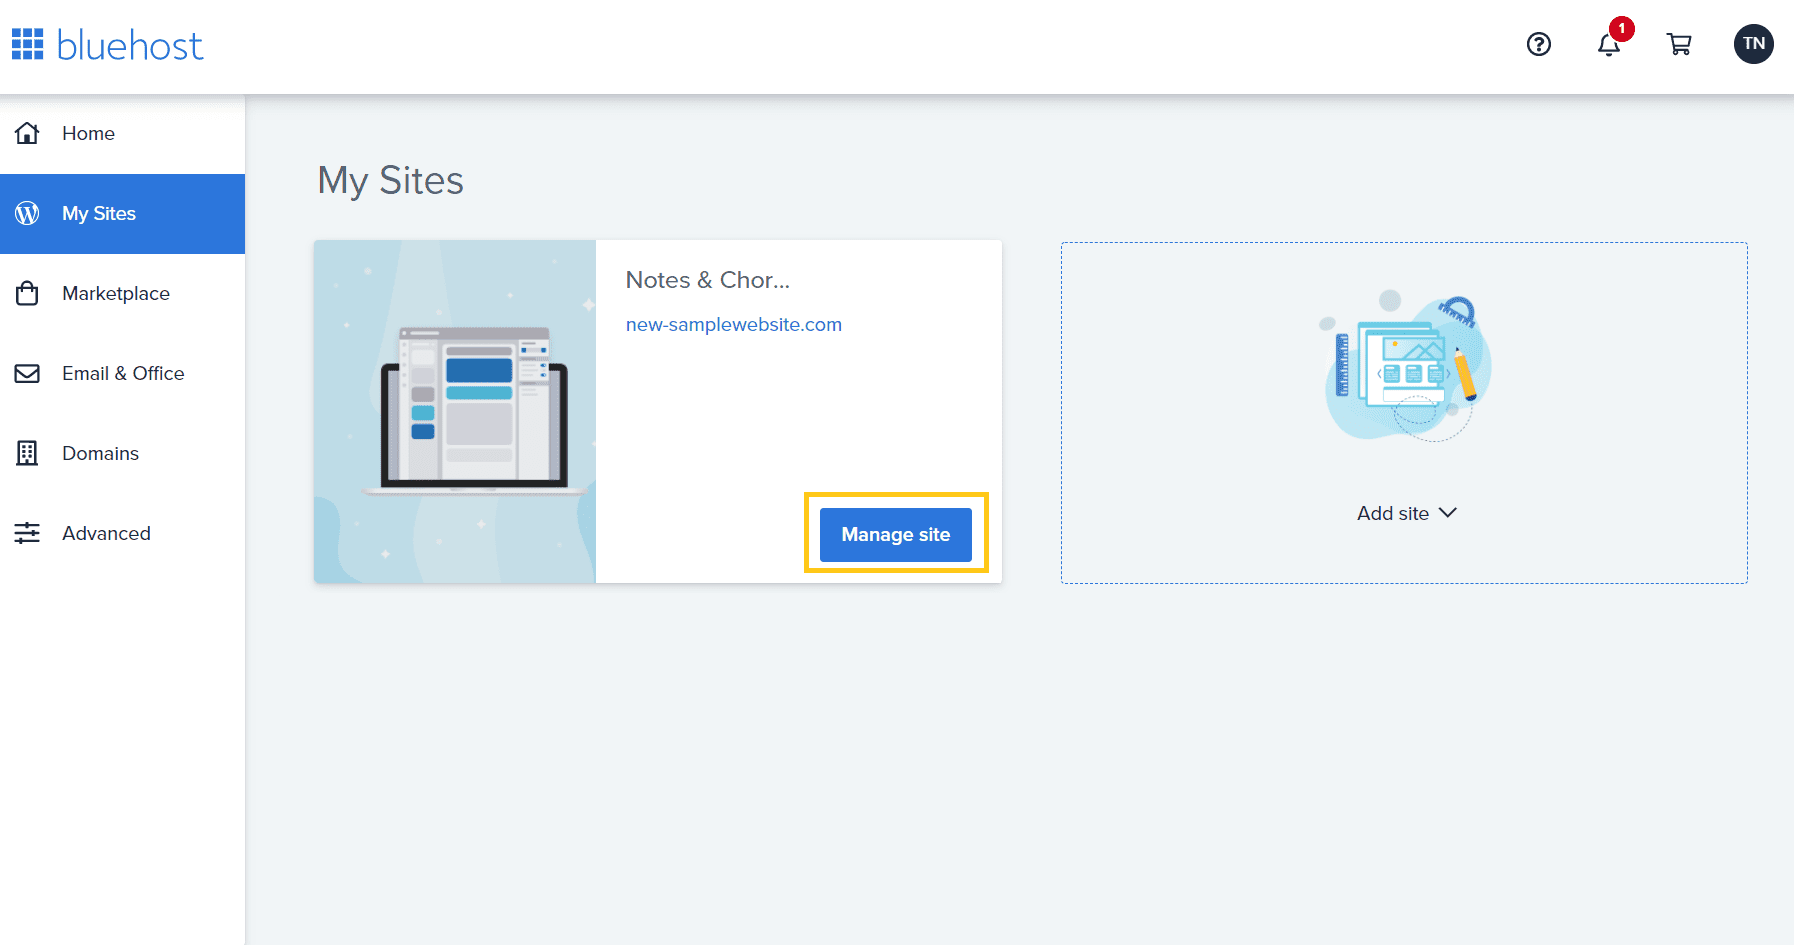
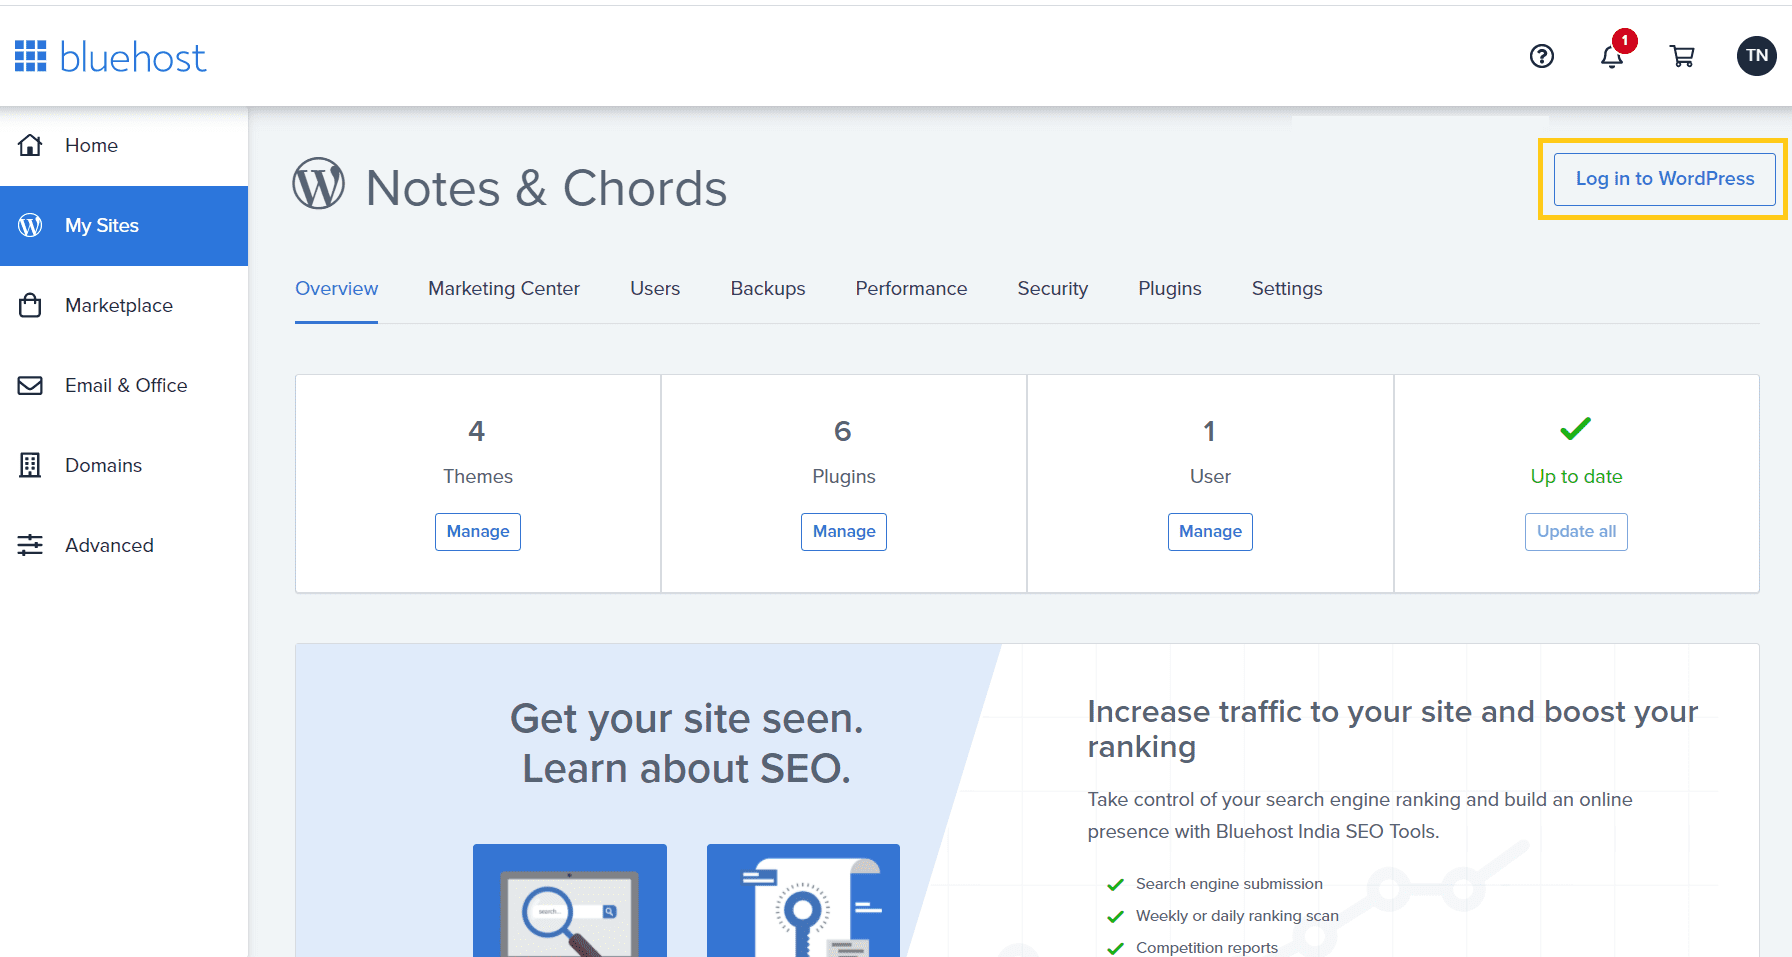
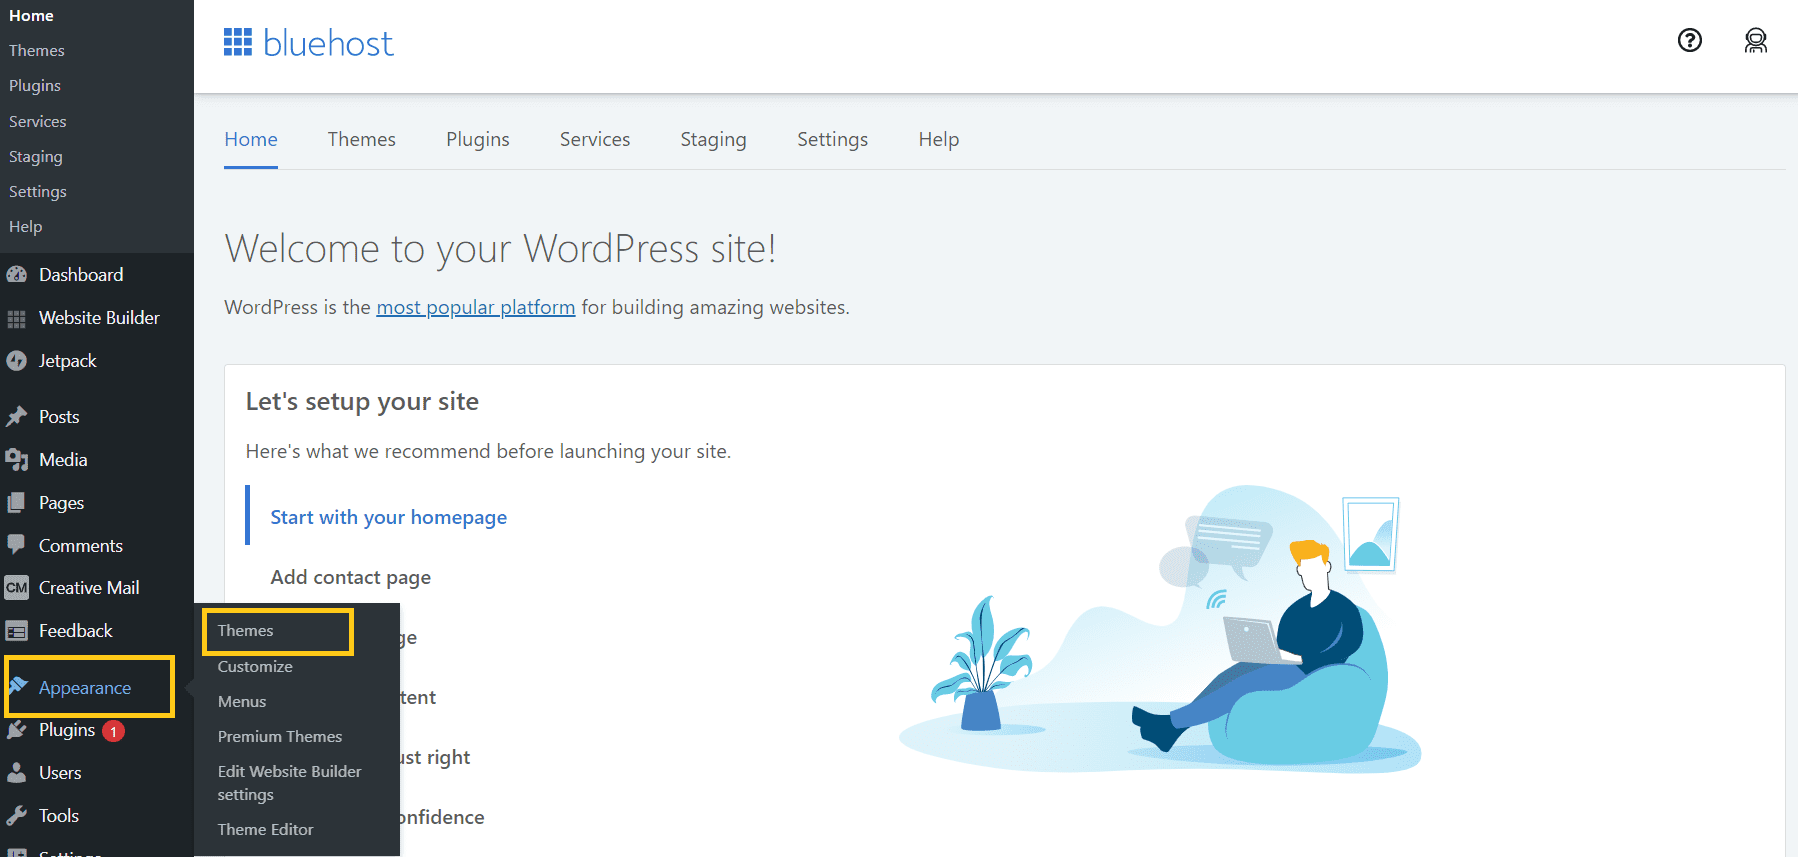
Step 1: Log in to your Bluehost account Step 2: Next, you will be redirected to the Bluehost dashboard. Here on the left-hand sidebar go to the ‘My Sites’ tab and click on the ‘Manage site’ button Step 3: Click on ’Log in to WordPress’ button on the right-hand sideStep 4: Go to your WordPress dashboard and under the ‘Appearance’ tab on the left-hand sidebar, click on ‘Themes’Step 5: After that, click on the ‘Add New Theme’ after which you will be directed to a page where you have options of searching a theme from the WordPress theme directory or you can even upload it from your local driveStep 6: If you want to use a theme available in the repository, you have different options of themes clubbed under different headings such as Featured themes, Popular themes, Latest themes and so onConfused much? Still could not find a suitable theme for yourself, don’t worry you can further filter your search by using the ‘Feature Filter’ button which lets you search themes based on features and layouts like grid layout, one or two-column layout.
You can even read through our detailed blog on how to choose a WordPress theme for your website.
Step 7: To check how the theme is you can hover the mouse cursor over the theme name and click on ‘Preview’. Once you’ve decided on the theme, click on ‘Install’ to install the themeYour selected theme will now be installed, and you will see a success message with the prompt for ‘Activate’ and ‘Live preview’ optionsYou click on the ‘Activate’ button and your selected theme will be live on WordPressPost installing the theme, you can click on the ‘Customize’ button to customize your theme as you see fit viz. changing the header, footer, menu layout, colour and font scheme, etc.
Method II: Upload your theme
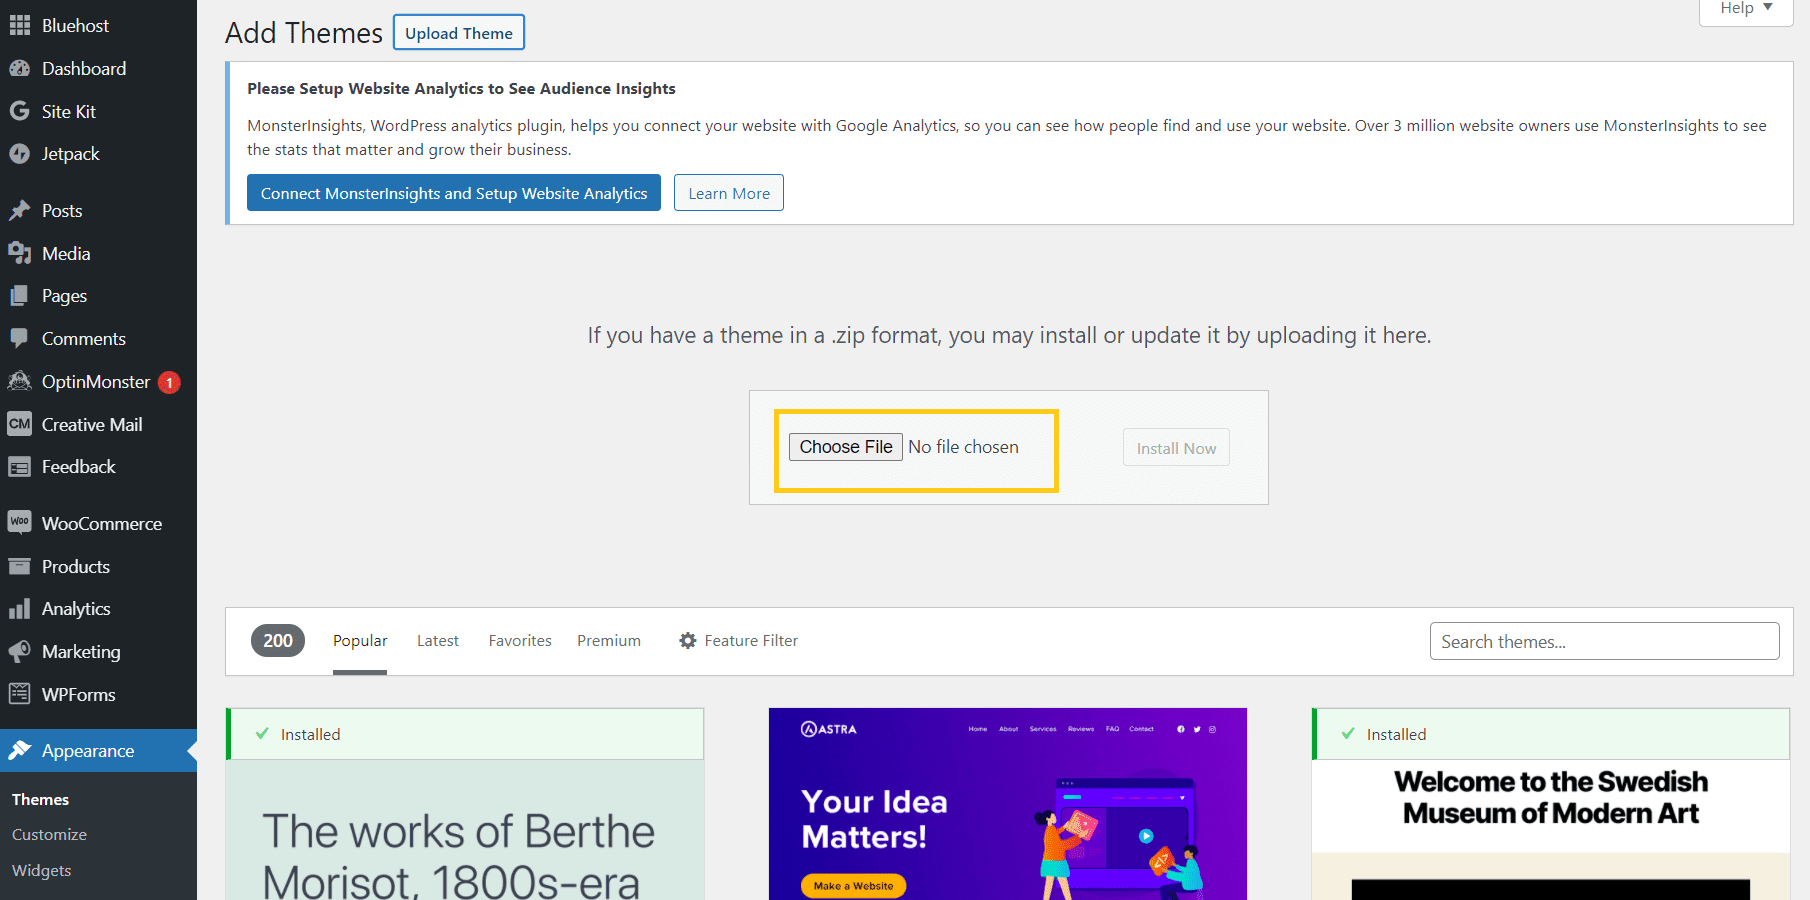
Now for themes that find on third-party or a premium theme you can simply upload it through your WordPress dashboard as belowStep 1: First, download or make sure you have the .zip file of the theme you wantStep 2: Go to the ‘Appearance’ tab on your dashboard, click on ‘Themes’ and then click on the ‘Upload’ theme buttonStep 3: You then choose the .zip file of the theme and click ‘Install Now’ and just as above once the theme is installed, we click on ‘Activate’ to make it live on WordPress
Install a WordPress Theme in 1-2-3
We hope this tutorial has provided you with a clear understanding of how to add a theme in WordPress. It’s important to choose a theme that aligns with your website’s purpose and effectively represents your business. Once you’ve chosen the right theme for yourself, you can leverage our managed SEO services to build, grow, and maintain your online store.
Additionally, there are many easy free WordPress themes available for beginners that are specifically designed for ecommerce purposes. These WordPress online store themes can help you create a visually appealing and functional online store to showcase your products and drive sales. For more valuable tips and information to enhance your online presence, we recommend visiting our WordPress Tutorials page.
Do not miss out on choosing the right hosting type for your online store. If you are just starting out, you can choose Shared Hosting, otherwise, you can choose from VPS Hosting and Dedicated Hosting. You can read our blog on the important points that you need to consider before buying hosting services.

 Step 2: Next, you will be redirected to the Bluehost dashboard. Here on the left-hand sidebar go to the ‘My Sites’ tab and click on the ‘Manage site’ button
 Step 3: Click on ’Log in to WordPress’ button on the right-hand side
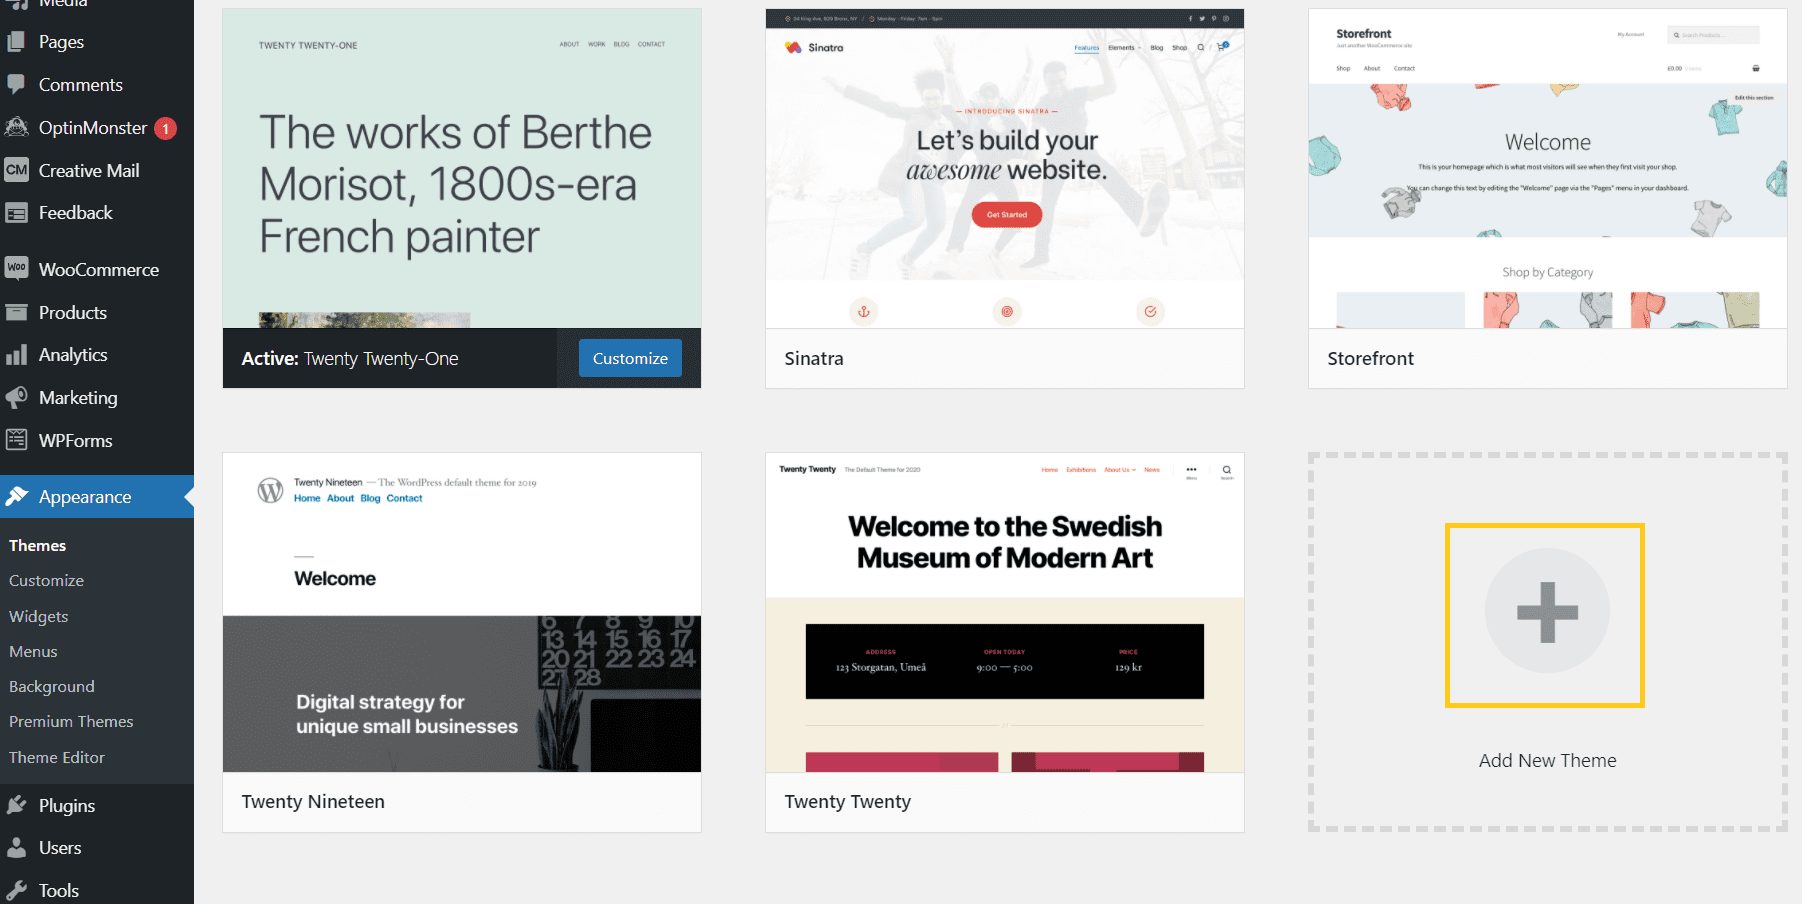
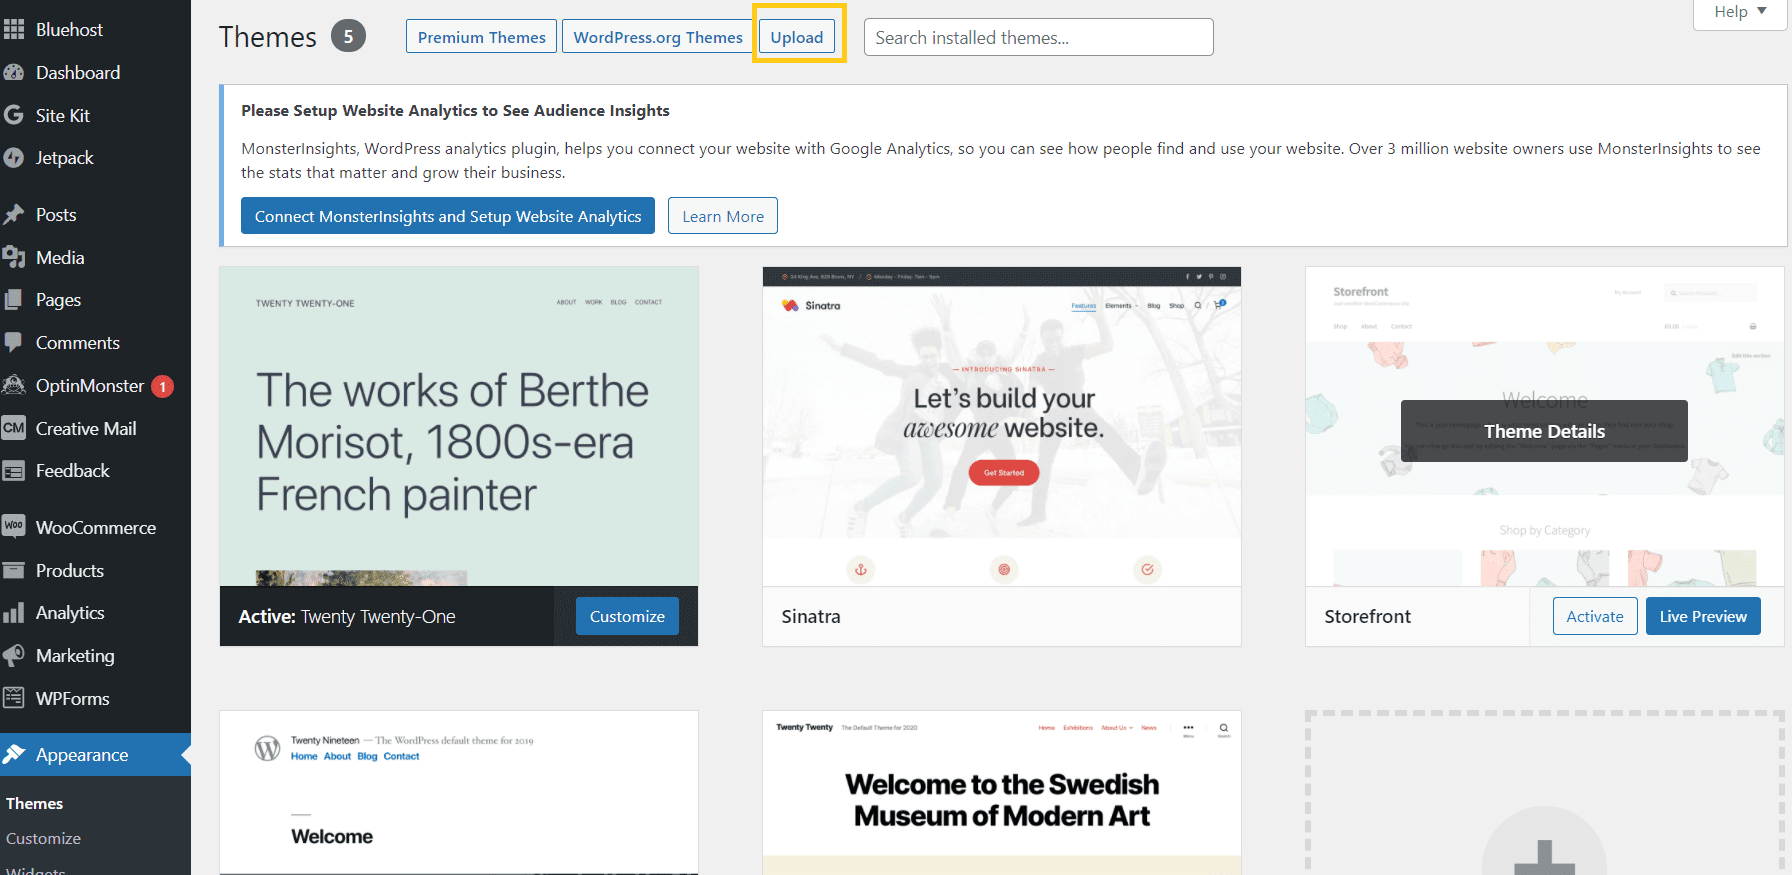
 Step 4: Go to your WordPress dashboard and under the ‘Appearance’ tab on the left-hand sidebar, click on ‘Themes’
 Step 5: After that, click on the ‘Add New Theme’ after which you will be directed to a page where you have options of searching a theme from the WordPress theme directory or you can even upload it from your local drive
 Step 6: If you want to use a theme available in the repository, you have different options of themes clubbed under different headings such as Featured themes, Popular themes, Latest themes and so on
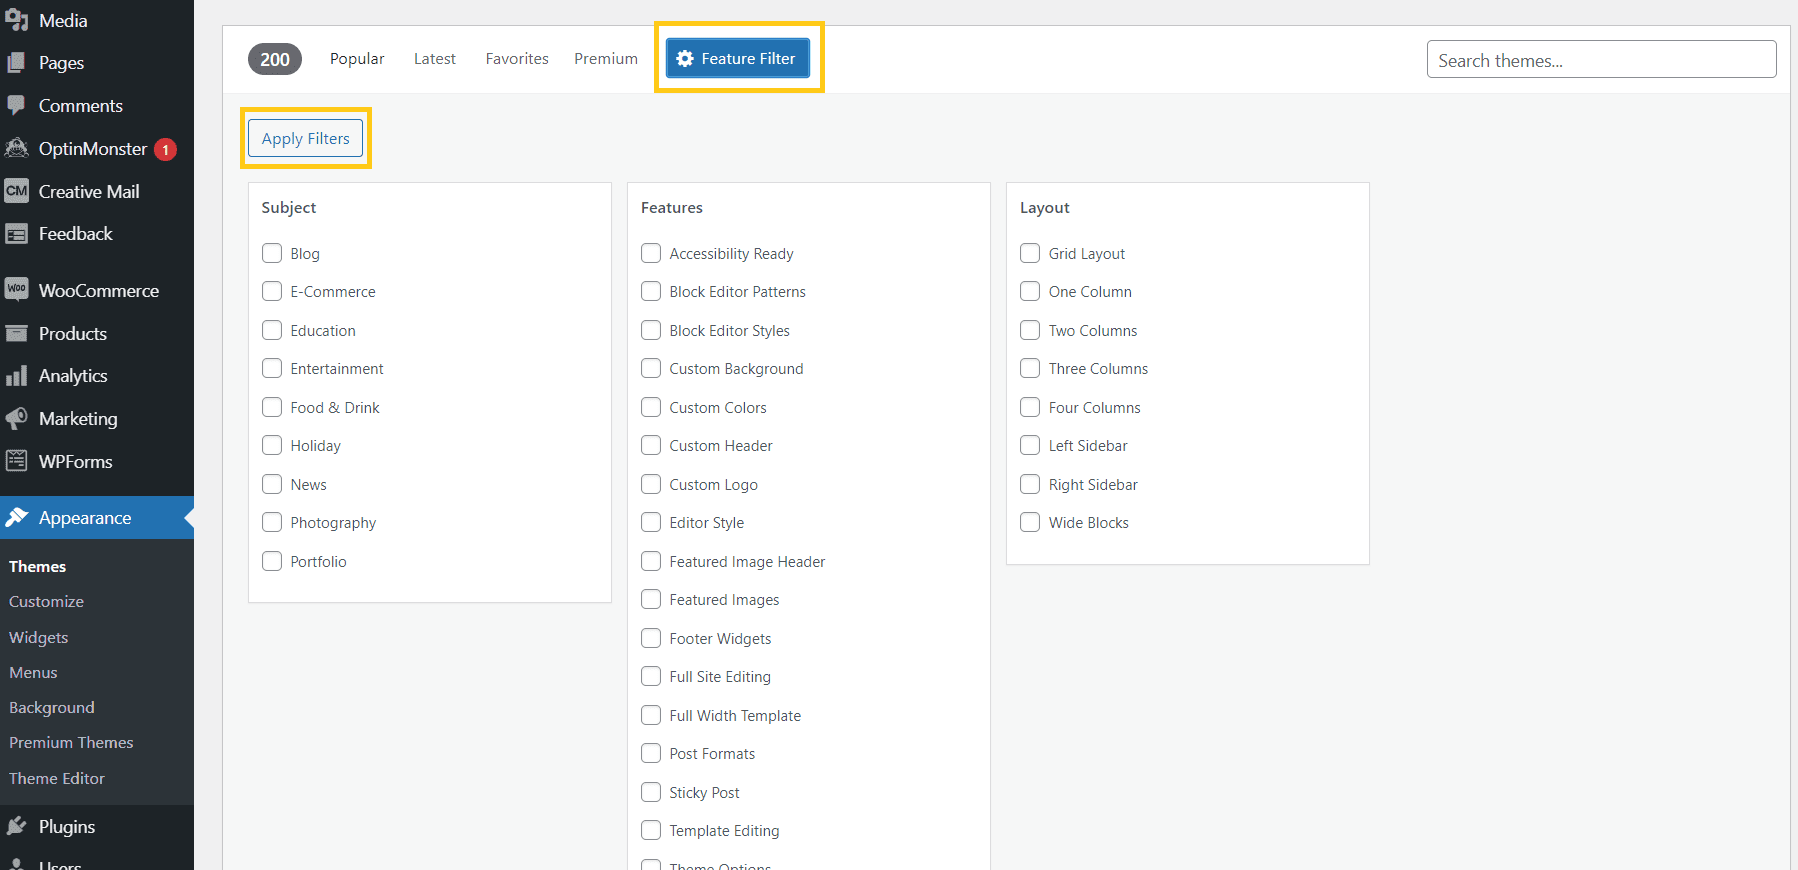
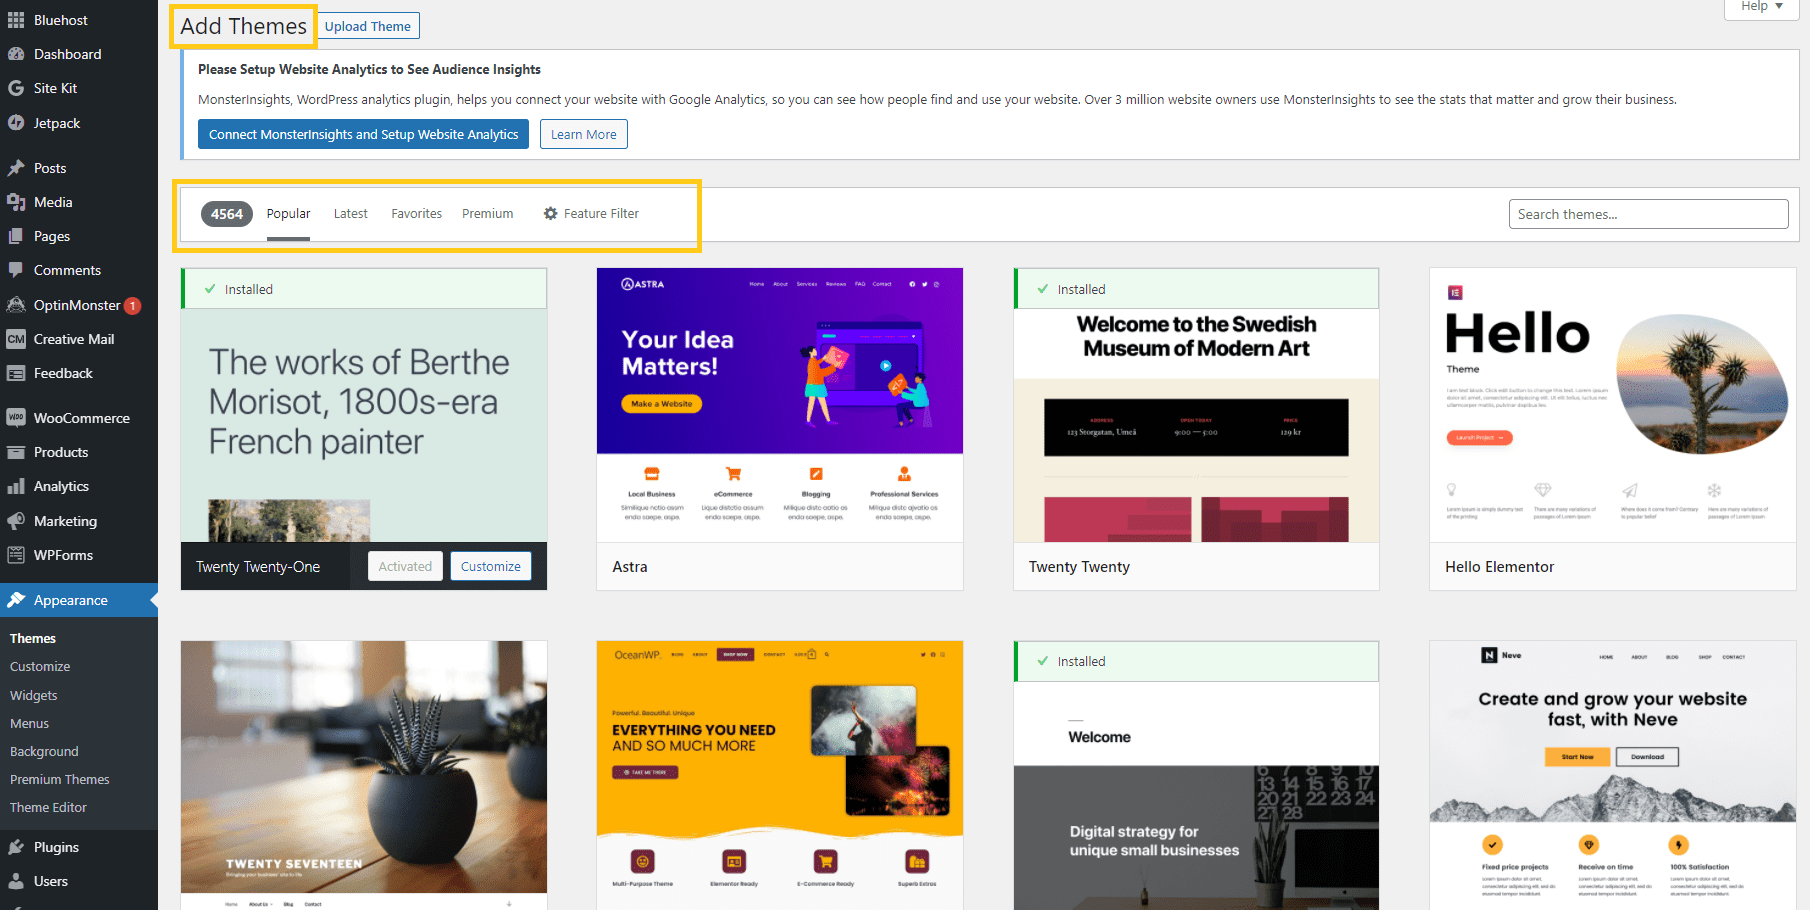 Confused much? Still could not find a suitable theme for yourself, don’t worry you can further filter your search by using the ‘Feature Filter’ button which lets you search themes based on features and layouts like grid layout, one or two-column layout.
You can even read through our detailed blog on how to choose a WordPress theme for your website.
Confused much? Still could not find a suitable theme for yourself, don’t worry you can further filter your search by using the ‘Feature Filter’ button which lets you search themes based on features and layouts like grid layout, one or two-column layout.
You can even read through our detailed blog on how to choose a WordPress theme for your website.
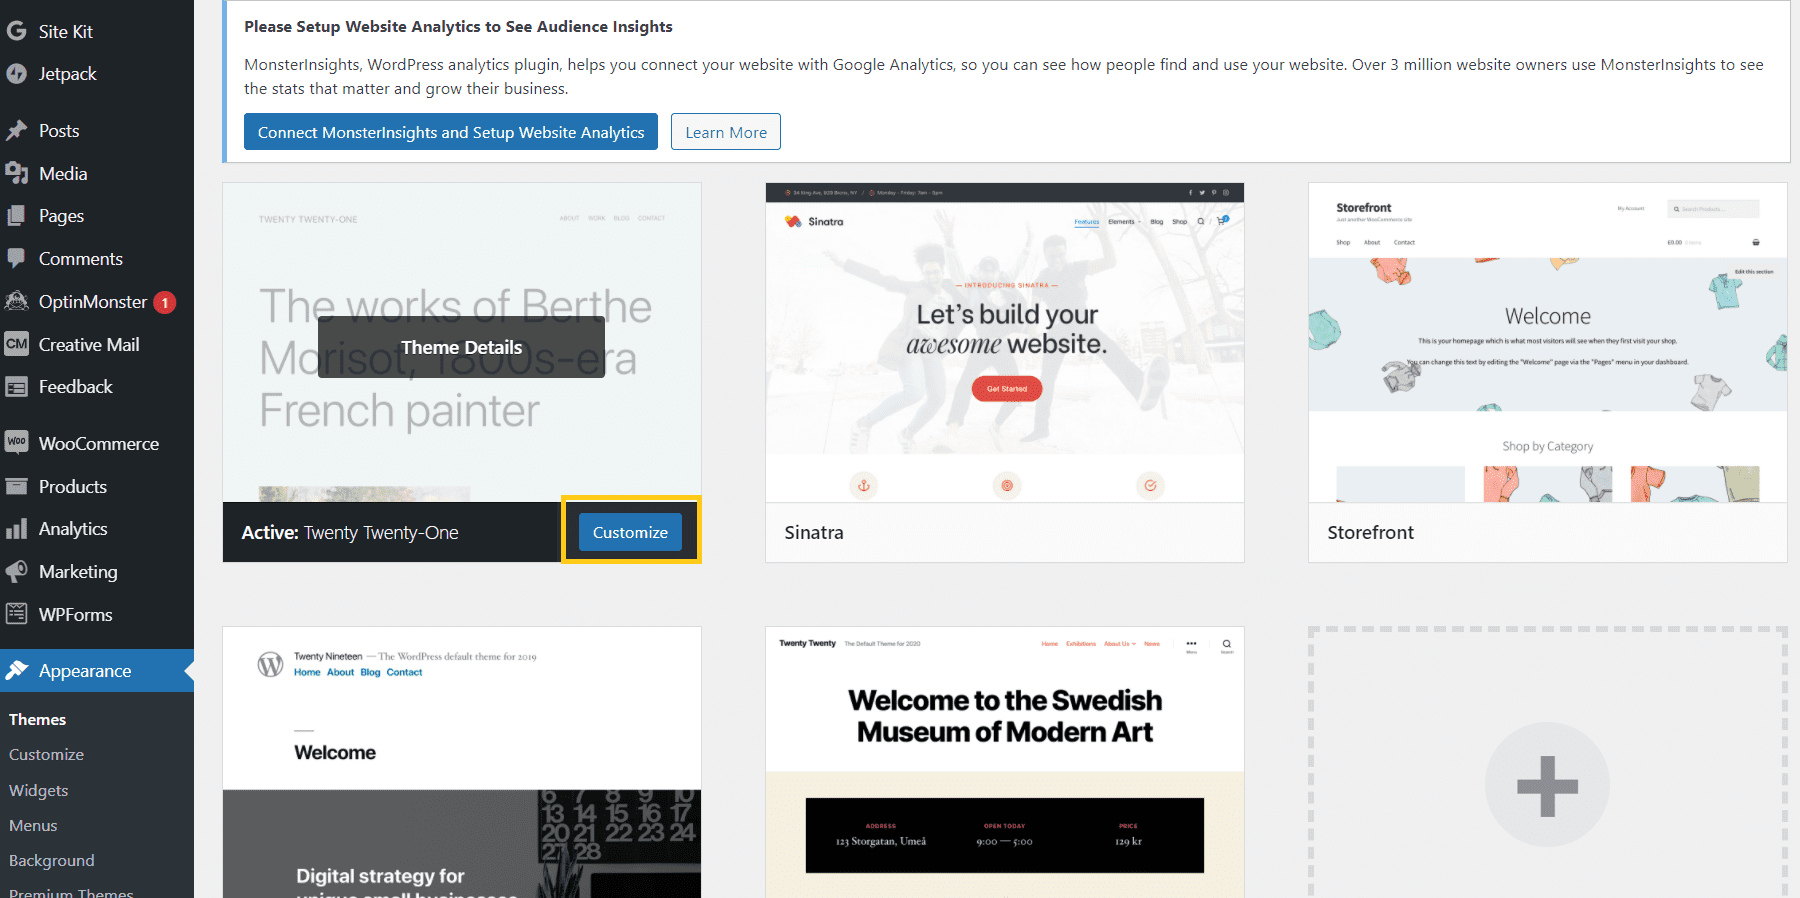
 Step 7: To check how the theme is you can hover the mouse cursor over the theme name and click on ‘Preview’. Once you’ve decided on the theme, click on ‘Install’ to install the theme
Your selected theme will now be installed, and you will see a success message with the prompt for ‘Activate’ and ‘Live preview’ options
You click on the ‘Activate’ button and your selected theme will be live on WordPress
Post installing the theme, you can click on the ‘Customize’ button to customize your theme as you see fit viz. changing the header, footer, menu layout, colour and font scheme, etc.
Step 7: To check how the theme is you can hover the mouse cursor over the theme name and click on ‘Preview’. Once you’ve decided on the theme, click on ‘Install’ to install the theme
Your selected theme will now be installed, and you will see a success message with the prompt for ‘Activate’ and ‘Live preview’ options
You click on the ‘Activate’ button and your selected theme will be live on WordPress
Post installing the theme, you can click on the ‘Customize’ button to customize your theme as you see fit viz. changing the header, footer, menu layout, colour and font scheme, etc.
 Step 3: You then choose the .zip file of the theme and click ‘Install Now’ and just as above once the theme is installed, we click on ‘Activate’ to make it live on WordPress


Write A Comment